Instructions


Downloading with BitTorrent

A BitTorrent app lets you download the maps from this site. As you download, the app uploads the parts of the files you've already received to other users. This helps us improve download speeds and reliability.

If you don't already have a BitTorrent app, we recommend one of these open-source and free apps:

Windows, macOS / OS X

qBittorrent
Back to Top

Unzipping the Maps

The map files are zipped to make the files smaller for download. We recommend unzipping the maps with the following open-source and free applications:

Windows

7-Zip
macOS / OS X

The Unarchiver
Back to Top

Installing the Map on an SD Card

  1. Unzip the file that you downloaded for the SD Card. You will have a file called “OpenMapChest <map name>.img”.
  2. Insert your SD Card into your SD Card reader. If you don't have an SD Card reader you can connect your Garmin GPS to your computer with a USB cable. Make sure that the SD Card is in the GPS unit before you plug it into the computer.
  3. Open the SD Card with the file manager. If there isn't a folder on the SD Card called “Garmin”, create one. The folder name must begin with a capital “G”.
  4. Copy the .img file into the Garmin folder on the SD Card.
    The map will not work if you put the file in the Garmin folder of the GPS device itself. The map must be placed in the Garmin folder of the SD Card.
    On some device you'll need to use the folder name Map (with capital “M”) instead of the Garmin folder. Create the folder on the SD Card if it does not already exist.
  5. Safely remove the SD Card once the file has finished copying.
  6. Turn on your Garmin GPS with the SD Card inserted and go through the following screens on your device:

    SettingsMap & VehiclemyMaps

    You should see the OpenMapChest map or maps in the list. Check the box beside the OpenMapChest maps to enable them. You should also uncheck the built-in map if the map areas overlap.

  7. Loading multiple maps is possible by simply copying another .img map into the Garmin folder.
  8. Be sure to fully restart the device after updating to a new version of the map. This insures that the device always reads the new map instead of keeping portions of the old map in its memory. The OpenMapChest maps should continue to be enabled - you won't need to enable them again.
Back to Top

Adding gmap to Windows BaseCamp

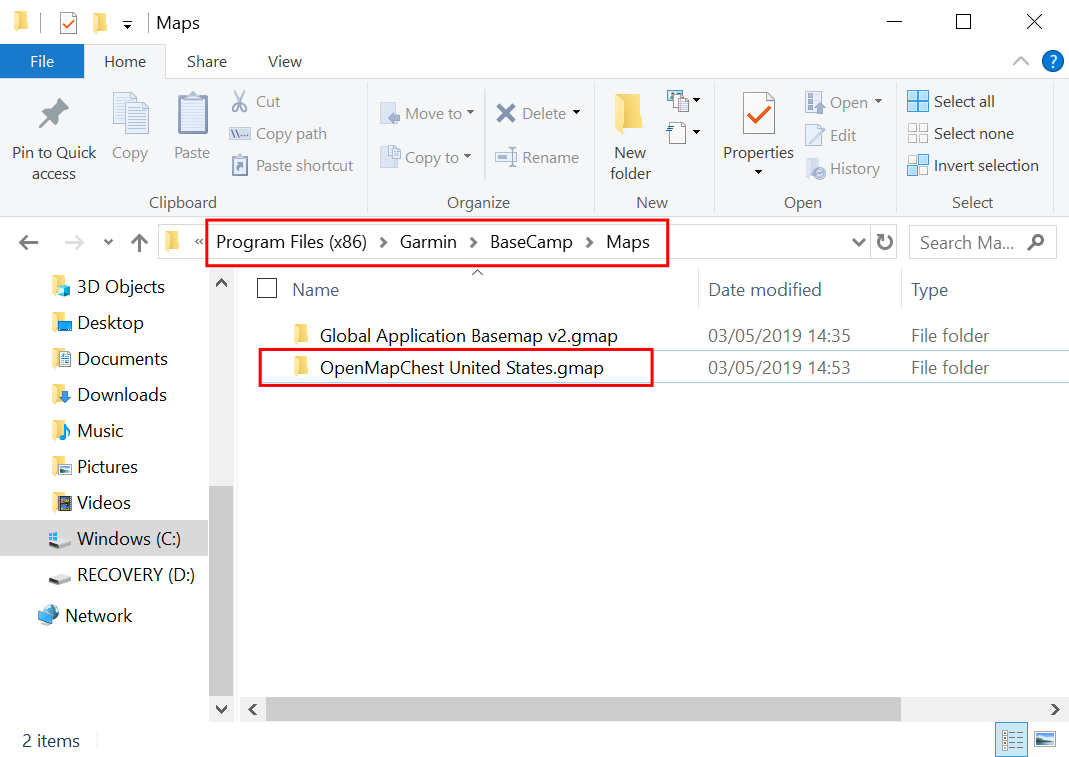
  1. Unzip the gmap file that you downloaded. You should have a folder named “OpenMapChest <map name>.gmap”.
  2. Move the .gmap folder to “C:\Program Files (x86)\Garmin\BaseCamp\Maps\”.
    The installation folder can be different on some computers. Try moving the .gmap folder to “C:\Garmin\Maps\” if the first folder doesn't work and this folder is present.

    An alternative on Windows 10 is to put the .gmap folder in “C:\ProgramData\GARMIN\Maps\”. This requires you to “unhide” the hidden ProgramData folder before the .gmap folder can be moved there.
  3. BaseCamp should be able to see the map the next time it starts. You should be able to enable the map from the “Maps” menu.
Back to Top

Adding gmap to MacOS BaseCamp

  1. Unzip the gmap file that you downloaded. You should have a folder named “OpenMapChest <map name>.gmap”.
  2. Use Finder to locate your Application folder.
  3. Hold Ctrl and click on the BaseCamp app icon. Select “Show Package Contents”.
  4. The “Contents” folder should show up. Select it and you will find a lot of files and folders.
  5. Drag “OpenMapChest <map name>.gmap” into the “Resources” folder.
  6. BaseCamp should be able to see the map the next time it starts. You should be able to enable the map from the “Maps” menu.
Back to Top

Testing the maps

It's possible to test a map when you're not in the area that the map covers. These instructions were made using a Garmin nüvi 2545 but other devices should have a similar procedure.

  1. You will need to put your GPS device into simulator mode. From the main screen, go through the following screen navigation:

    SettingsNavigationGPS SimulatorCheck box

  2. Return to the main screen by pressing the back button a few times.
  3. Next you need to set the location to a point in the country or area that you want to test the map in. From the main screen, go through the following screen navigation:

    Where To?SavedSelect any saved POI (Information icon button)

  4. You will now see the map view on one side. You need to set a specific location in the target country.

    • Zoom out until you can noticeably see countries or states/provinces on the map.
    • Drag your finger across the screen and move the map towards the country or area you would like to test.
    • Zoom in again ensuring that the country that you want to test the map in remains in the center of the screen as you are zooming.
    • Tap on a road to get the blue map flag and then tap the flag. Tap the Set Location button that appears in the side panel.
      Tip Simulation mode will be disabled when the GPS goes to sleep or is turned off. Be sure to save a POI in the area where you want to test the map so that you can quickly return to it in simulation mode.
  5. Return to the main screen again by pressing the back button a few times.
  6. You can now test the map as if you were at the location that you have set. You can search for POIs and addresses, and even simulate driving the route.
Back to Top

Using OpenMapChest on older devices

These instructions were made using a Garmin nüvi 255W but other older devices should have a similar procedure.


Filename on the SD Card

Older GPS devices require the filename of the map to be called “gmapsupp.img”. This file needs to be in the “Garmin” folder on the SD Card.

Some older GPS devices with updated firmware from Garmin are able to load two maps at the same time. The first file should be named “gmapsupp.img” and the second file named “gmapsup1.img”. In this case, both files need to be in the “Garmin” folder on the SD Card.

Refer to the instructions in Installing on an SD Card for complete instructions noting this and possibly the next difference.


Enabling the maps

Older devices have a main screen button called “Tools” instead of “Settings”. You will need to use these screen navigation steps to enable the maps:

ToolsSettingsMapMap Info

Refer to the instructions in Installing on an SD Card for complete instructions noting this and possibly the previous difference.


Turning on Simulation Mode

Older devices have a main screen button called “Tools” instead of “Settings”. You will need to use these screen navigation steps to turn on Simulation Mode:

ToolsSettingsSystemSimulator On

Refer to the instructions in Testing the maps in other locations for complete instructions noting this difference.